CamaroDMD
Insert Cool Title
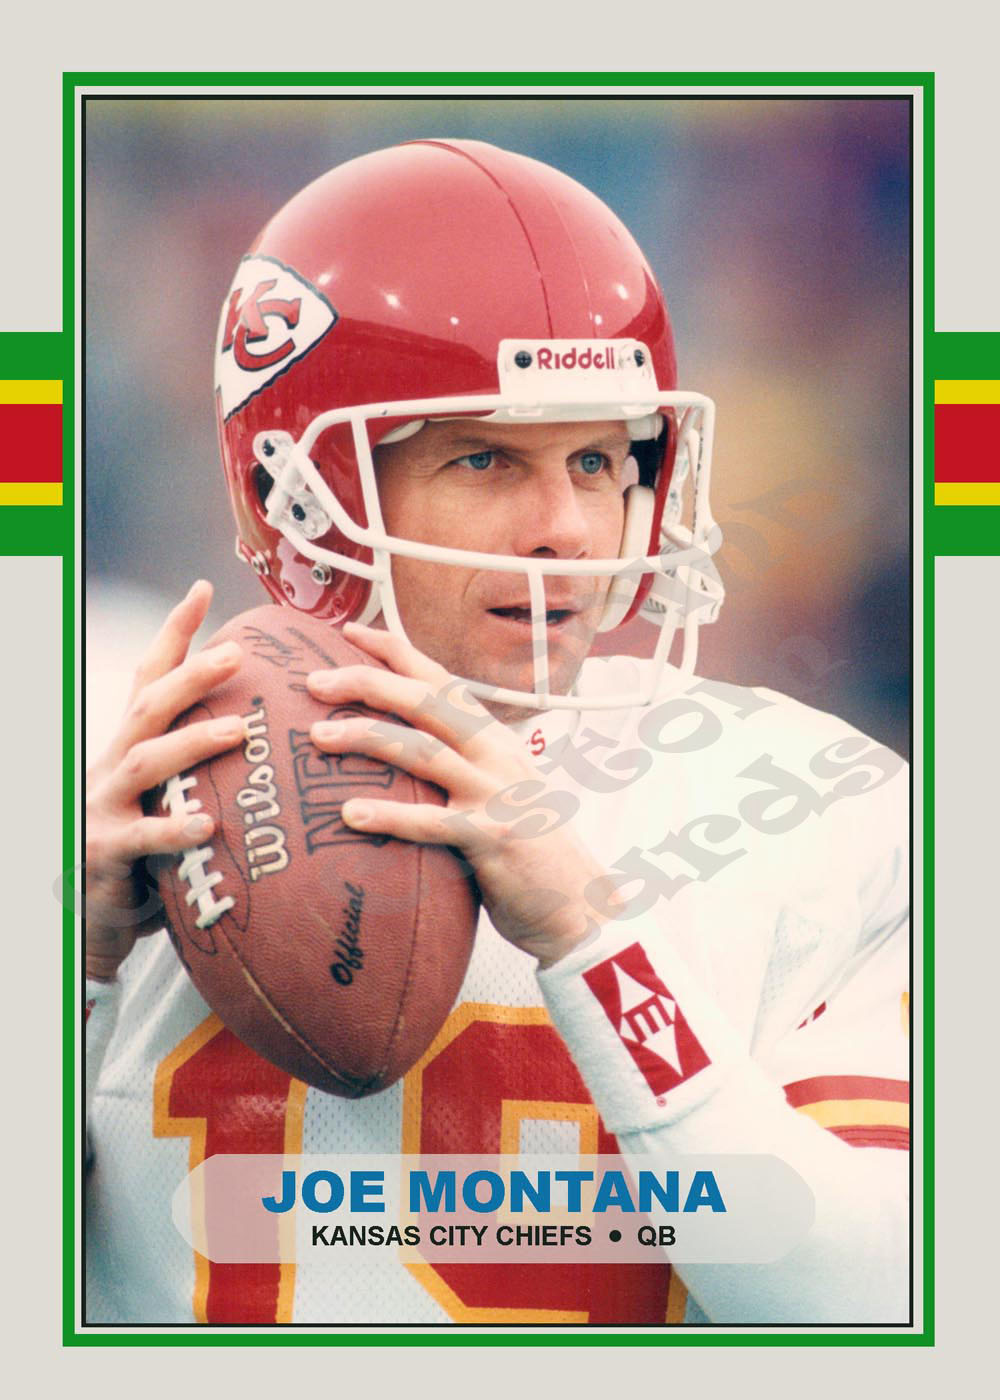
In this tutorial, I will cover how to create a custom card from scratch. I create cards normally for a reason. Either to create a card that I feel was “left out” of a set or because I want to commemorate an event…or sometimes just for fun. For the purposes of this tutorial, I’m going to create a card that commemorates the trade of Joe Montana to the Chiefs. This occurred prior to the 1993 NFL season.
My design will be based on one of the Topps Traded sets…as Topps Traded was just for this kind of theme. I’m a big fan of the 1989 Topps set (long story) so I will be doing the card in that design. 1989 Topps is also a good choice for a tutorial as it’s a fairly straightforward design…so it’s a good place to start.
I like to start creating a custom card by starting with the front side first. There are many ways to do this and I am far from an expert when it comes to Photoshop. This will be a crash course in how I do it but if you are new to Photoshop I encourage you to look at some online basic Photoshop tutorials and youtube videos. You will get a much better Photoshop education that I can provide. This tutorial does not show every feature of Photoshop and I find that I learn a new tool or trick with each card I create. So, playing with the program and reading general tutorials in using the program will be a big help.
One video I do highly recommended is the following Youtube video. I did not create this video nor do I have anything to do with it. But, when I first stated creating customs it gave me some basic information that was very helpful.
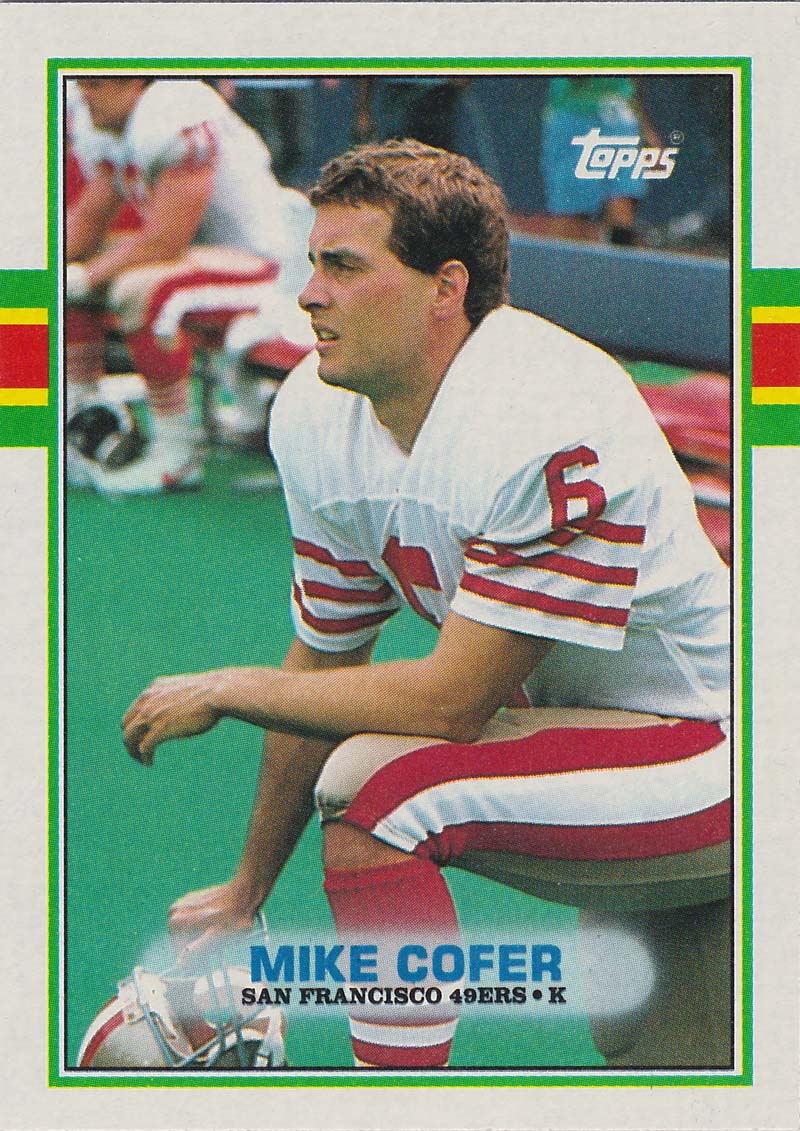
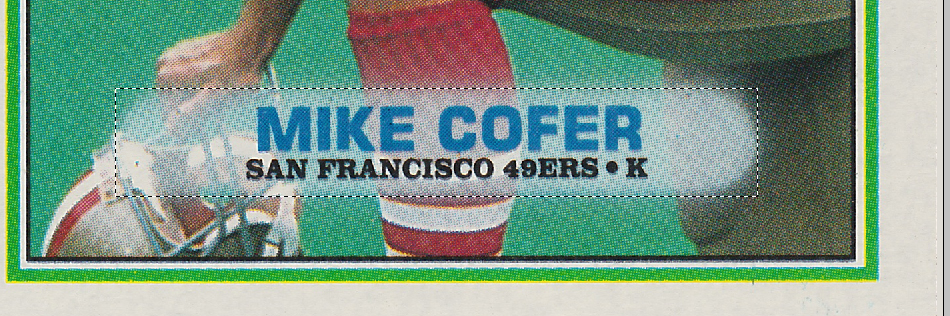
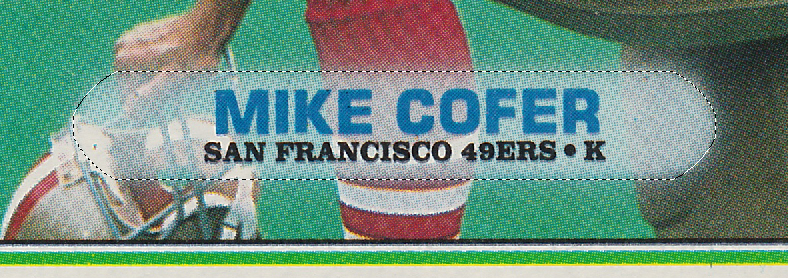
The first thing you will need is a nice template card to use a as model for your project. 1989 Topps have a variety of different colors for the stripes and boarders on the front and they do not correspond to the team colors. So, I did some research and picked a color set of colors that I liked. I have chosen to use the 1989 Topps Mike Cofer card as my model.
Once you have selected your model card, scan it and crop it. Resize it to be 1500x2100. Make sure the card scales properly when resized. It probably won’t be exactly 1500x2100…but you want the biggest side to match that size. For example, my scanned Cofer is actually 1495x2100. That will work.
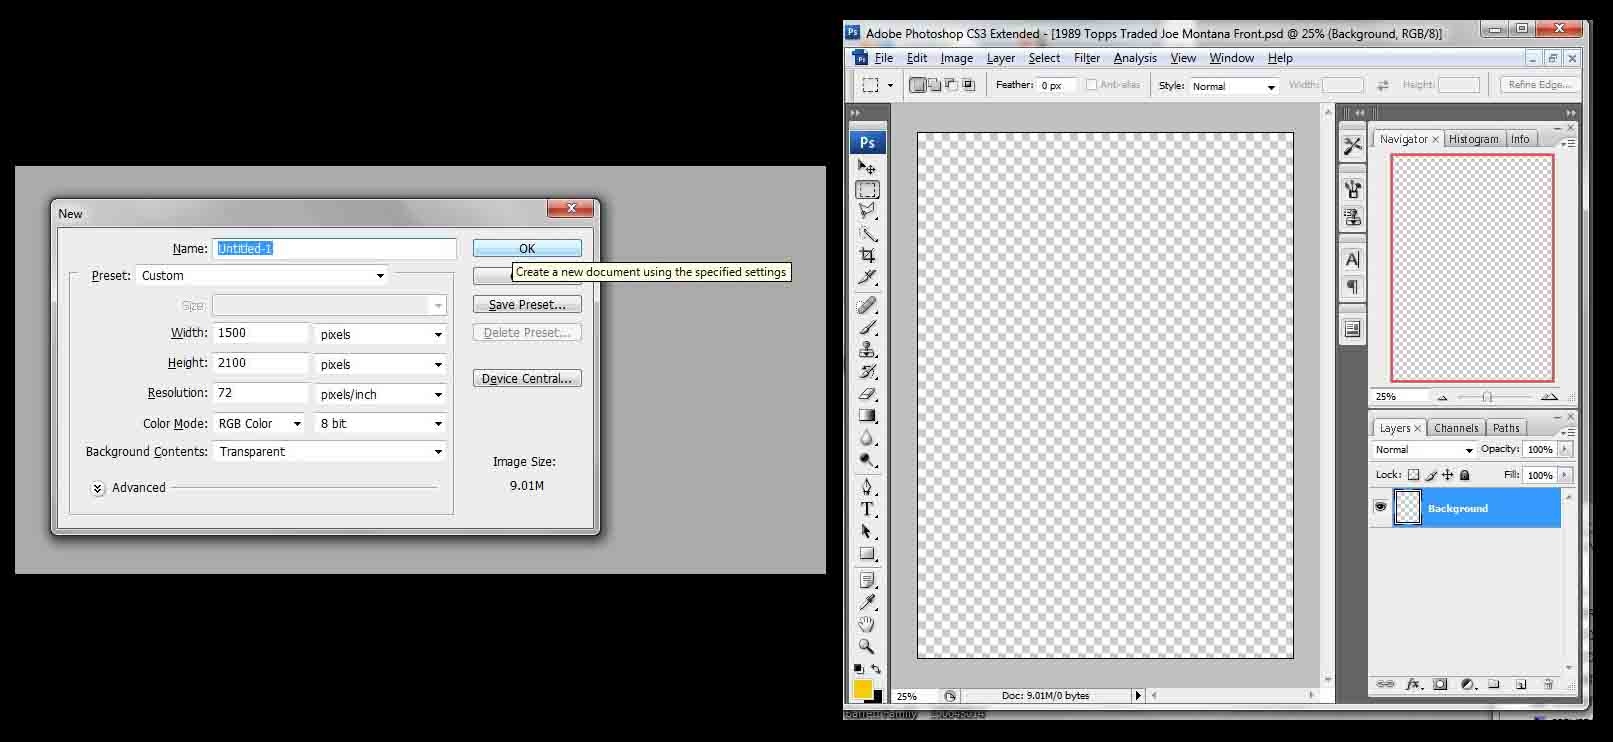
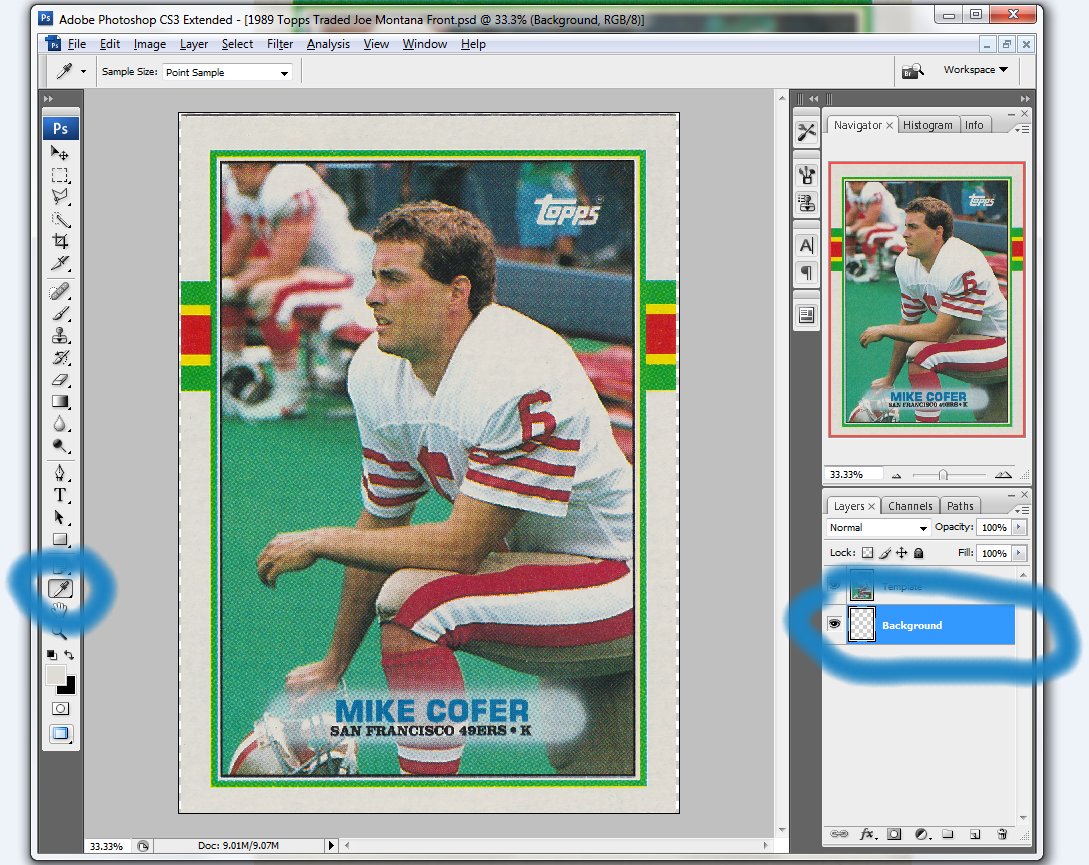
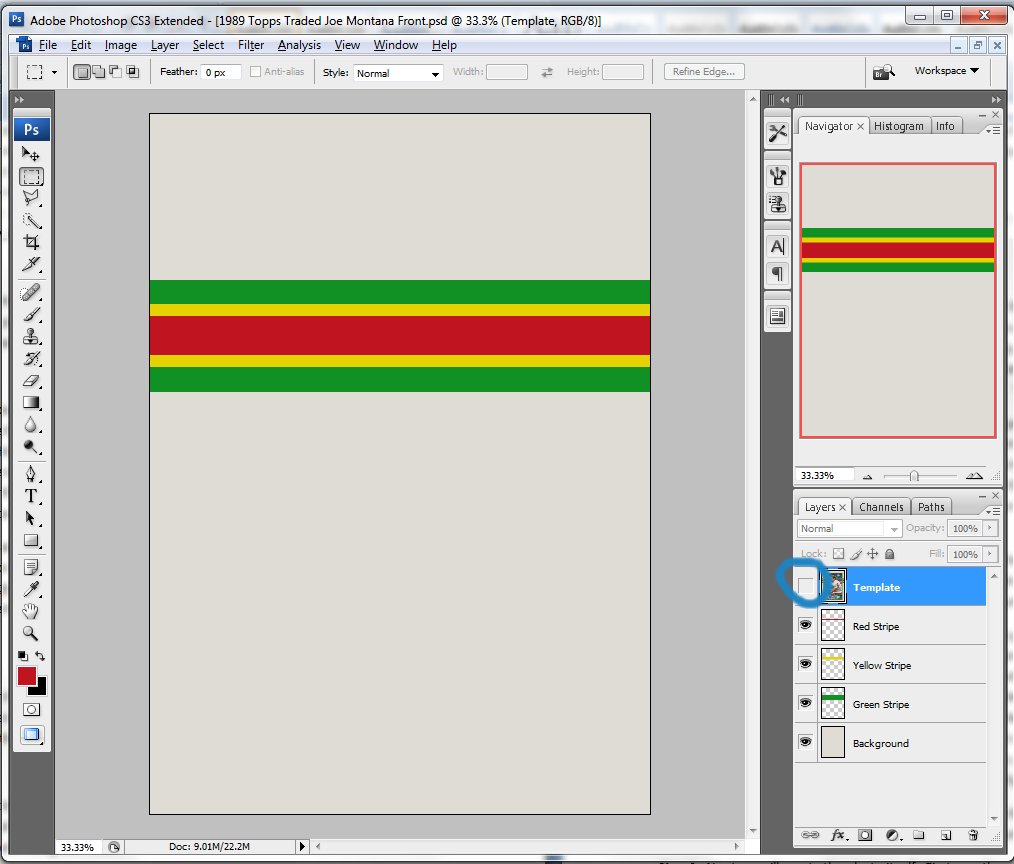
Once you have your model card…you are ready to start. Open Photoshop and select File/New. You want to create a new project with the Width at 1500 pixels and the Height 2100 pixels. Make the background transparent. Click OK. This gives you your basic card size and outline. In the lower right hand corner you should see your layer…it should say “Layer 1.” Double click on that and rename it “Background” and press enter. Keeping your layers organized is going to be very important as you will be frequently moving from layer to layer.
Next, drag your model card into Photoshop and center it as best as you can (it will probably be slightly smaller than your 1500x2100 project). Also, if your scanned card is off center, now is the time to center it in your project. Once you have it centered, rename this layer “Template.”
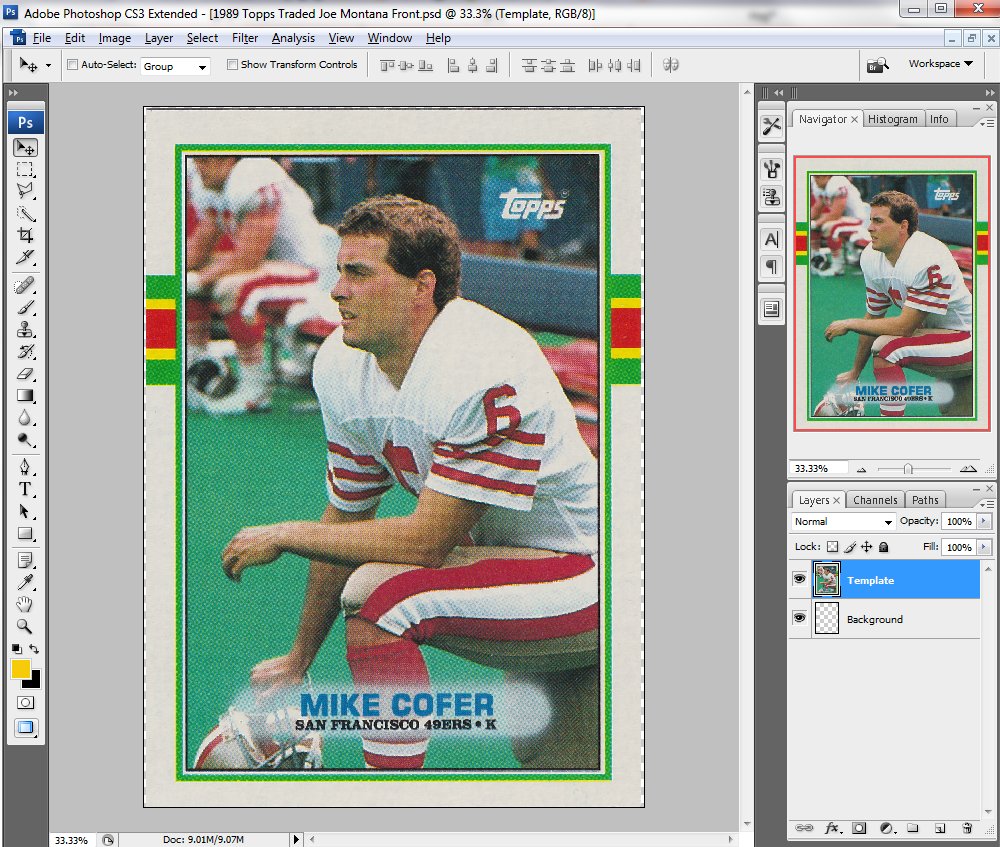
Now is time to actually start building your card. I like to build cards from the outside in…layering each component together to make the final image. First thing you want to do is look at the design. With 1989 Topps, the card has a white stock and you have a 3 color stripe that runs horizontally across the card roughly two thirds of the way to the top. That is broken by a colored boarder that matches the outside color of the stripe (in this case green). Inside the green boarder there is a white stock boarder and then a very thing black box around the photo. You want to replicate each part of the design.
First you want to color your background. Take the eye dropper tool and click the white card stock of the card. This will select that color. Next, click on the “Background” layer in the lower right (so that layer is selected) and press Alt+Delete. This will fill the transparent background with that whitish color. If you click the “eye” next to the “Template” layer (so it hides the layer), you will see your background is now the same white as the card.
Next, we will create the green horizontal stripe. First, click the new layer tab in the bottom right. A new layer should be created, make sure it’s the top layer on the list (if not click and drag it to the top). Name it “Green Stripe.” Next, take the eye dropper tool and click the green color of the stripe.
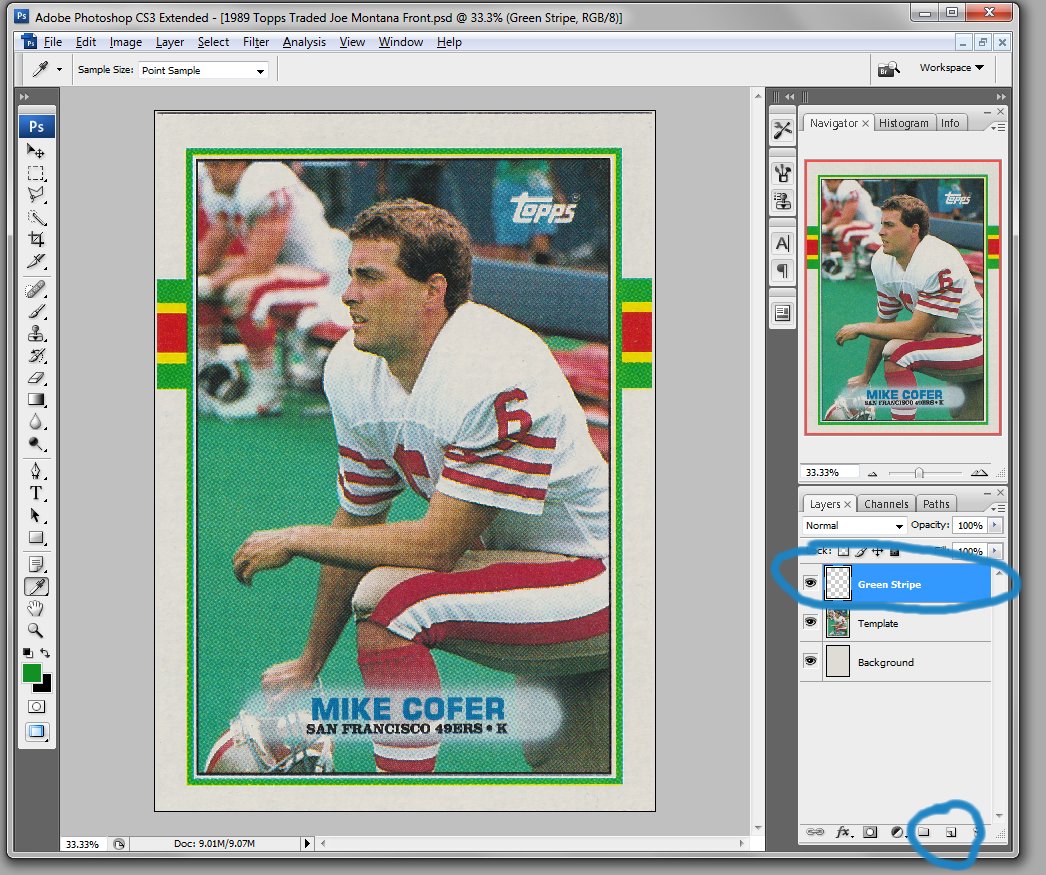
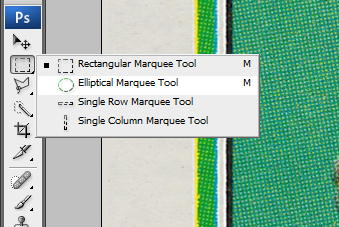
Now, let’s create the green stripe. Make sure the “Green Stripe” layer is highlighted. Click the Rectangular Marquee Tool and create a selection with it that traces the green stripe. Press Alt+Delete and that selection should fill with the green color.
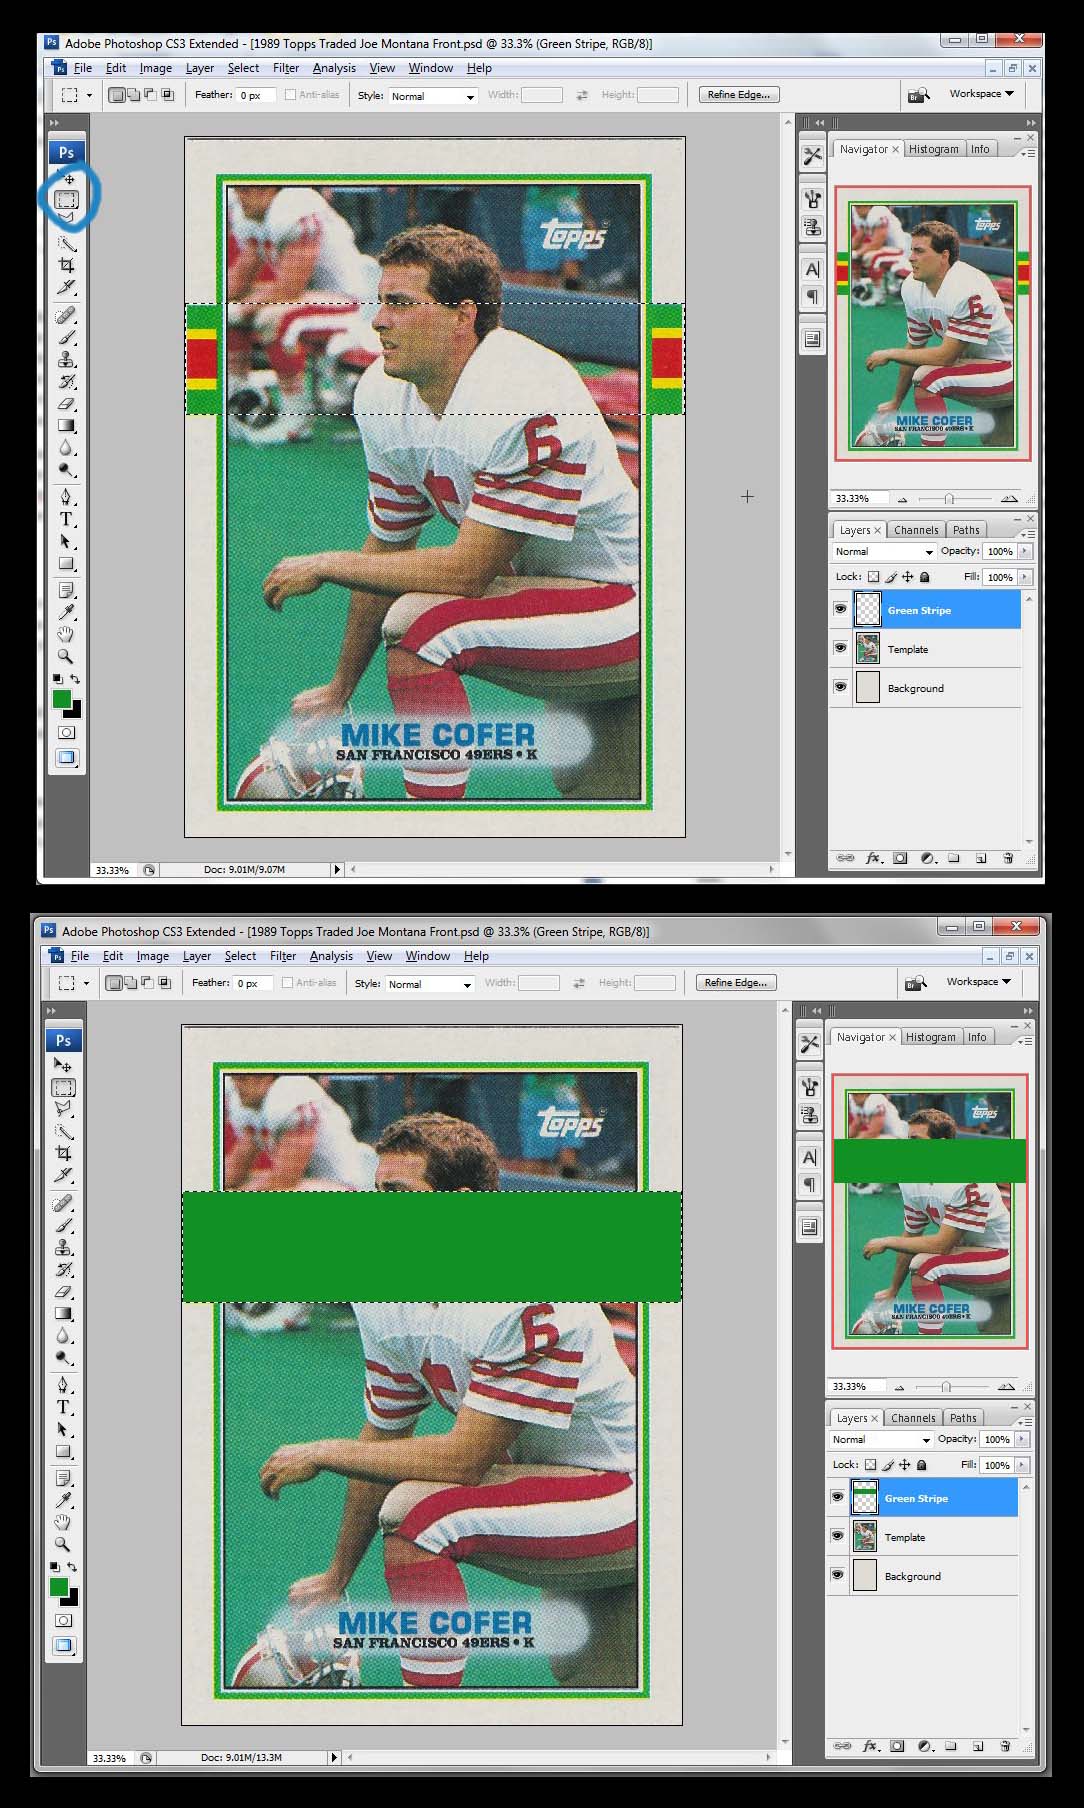
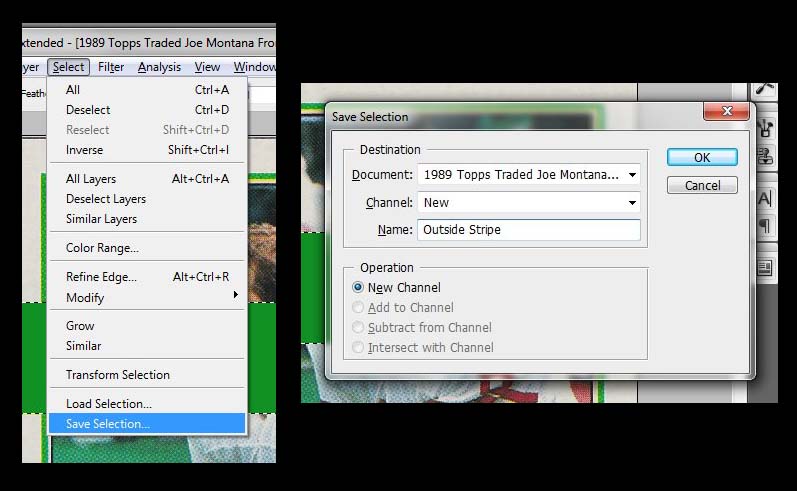
I like to design my cards in such a way that the design is repeatable. Perhaps I’d like to create another 1989 Topps card in the future…so I like to save my selections. That way, you can call it back up in the future. At the top click “Select” and at the bottom is “Save Selection.” Click “Save Selection” and name it “Outside Stripe” and press OK. I do this for all my selections.
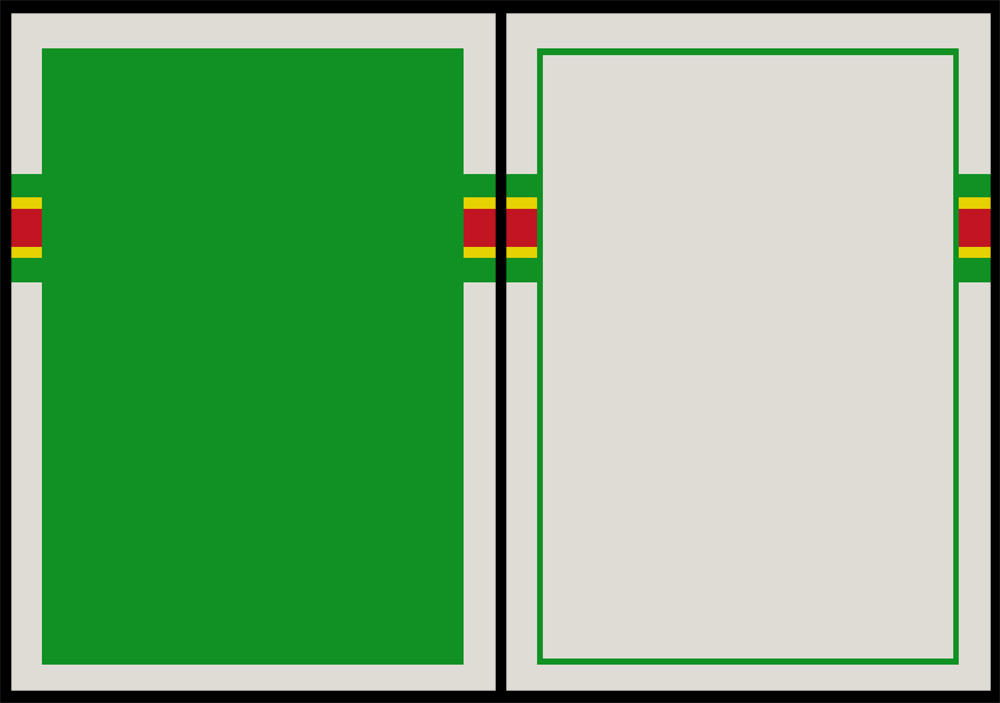
Drag the “Template” layer to the top of the layers list…and repeat these steps for each of the other two stripes. Once you have all three stripes made, it should look like the image below. Click the “eye” next to the template layer to hide it. Here is your card so far:
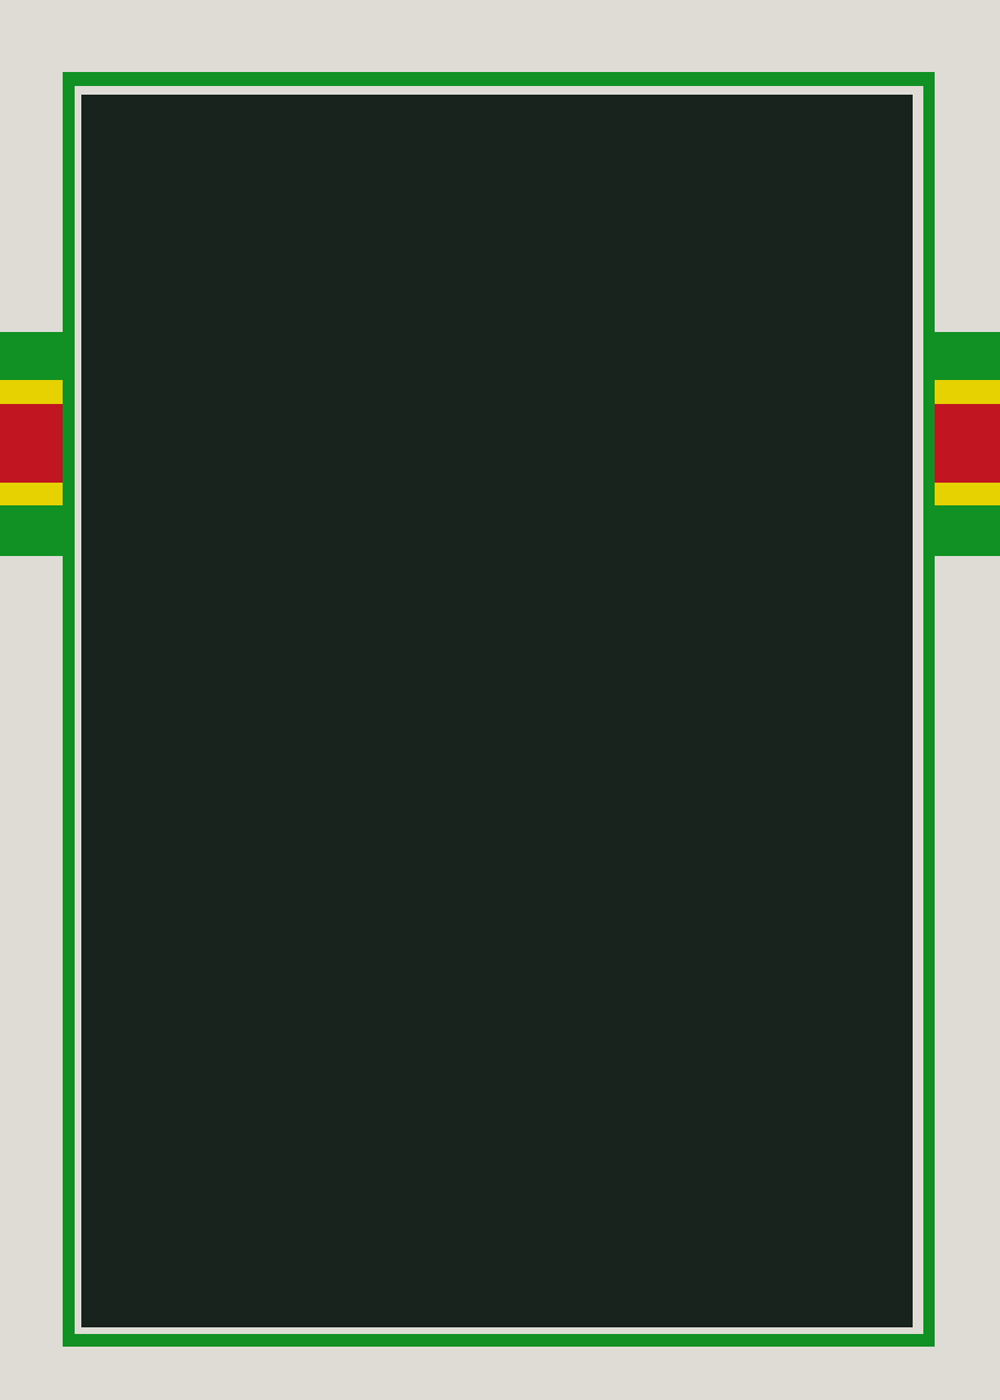
Now that the stripe is done, it’s time to start making the photo boarder. We are going to do this using the same technique. Use the eye dropper and select the green off the card you are creating (not the template – whenever possible pull colors off your card as the template will not have perfectly uniform colors). Create a new layer (name it “Green Boarder”). Using the Rectangular Marquee Tool, outline the green photo boarder and fill it using Alt+Delete.
Next, select the whitish cardstock color with the eye dropper. In a new layer (“White Photo Boarder”) trace the white boarder around the photo (just inside the green boarder) with the Rectangular Marquee Tool and fill. It should look like this:
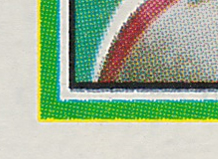
A common theme with a lot of Topps cards is a thin black boarder around the photo. If you zoom in on your template you will see this it. Look here:
To make the cards look as authentic as possible, I like to replicate this. Now, Topps didn’t use a true black for these types of boarders. It’s more of a dark grey. So, I like to use the eye dropper tool to select that color and again, use the Rectangular Marquee Tool to outline the boarder and fill it (in a new layer titled “Black Photo Boarder”).
Your card should now look like this:
Now come the part where we turn our collection of colored boxes into an actual football card. Do a google search and find a photo of the player. Try to find one that is a higher resolution if possible. The lower the resolution, the more you will have to stretch it and the grainier it will look. Once you have your photo, set it aside.
Next, take your Rectangular Marquee Tool and draw a rectangle around the boarder of the photo…in the exact same way you have done several times up to this point. But, this time…rather than fill that selection, you want to save it. Name the saved selection “Photo.” If you haven’t been saving your selections up to this point, look above for instructions how (right after the green stripe was made I discussed this).
Now, drag your photo into Photoshop. This will bring the photo into the Photoshop program but as a different project. In the layers tab, you will see it say “Background.” Simply drag that onto your card project and the photo will appear as a new layer.
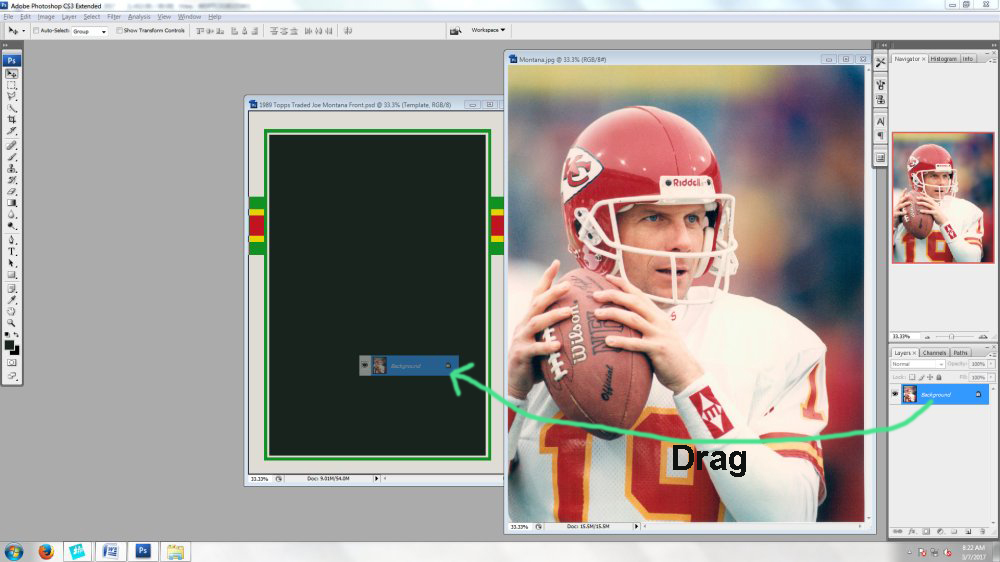
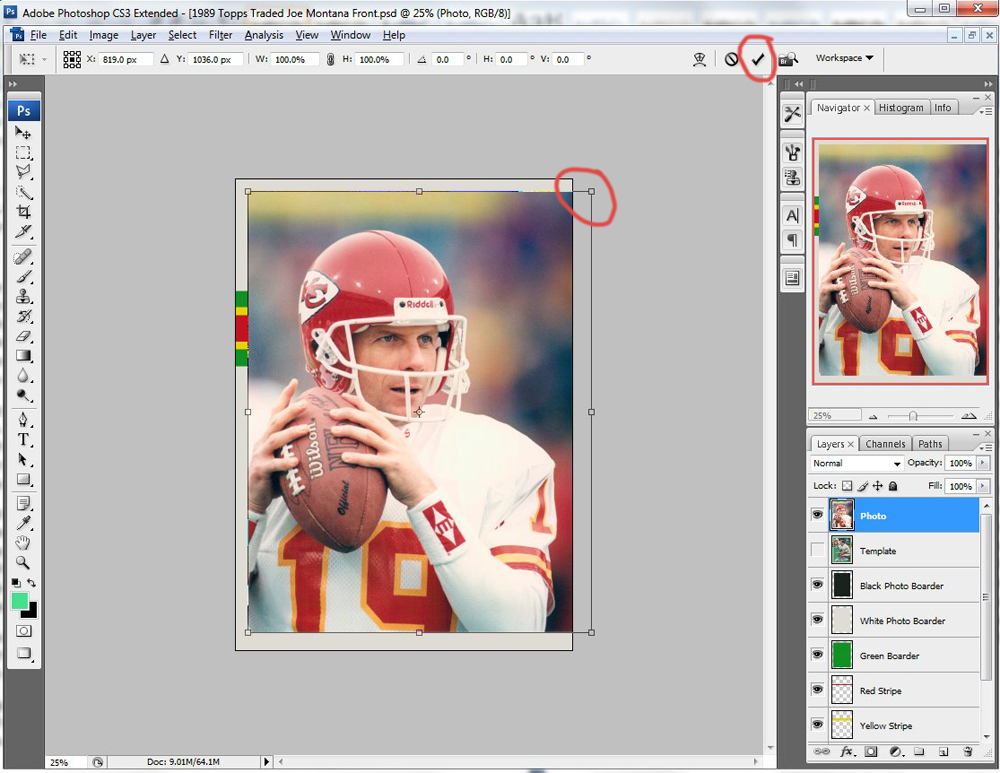
Rename the new layer “Photo.” At this point, you want to get the photo to be roughly in the right place. If the photo is too big or too small…press Control+T to put it in free transform mode. You will now see the boarders of the photo highlighted. Hold down shift (this will keep the scale accurate) and grab one of the corners to resize the photo. Get the photo to roughly the right size and then click the check mark at the top of the screen to lock it in place. While in Free Transform mode you can also drag the photo around to get it in the right position. It’s OK if some of the photo is off the project as long as the part of the photo you want to use is roughly correct.
Now it’s time to create a layer mask to frame your photo. Make sure the “Photo” layer is selected. Just above the layers you will see a few tabs, one of them is “Channels.” Click on that and you will find all your saved selections. At the bottom should be “Photo.”
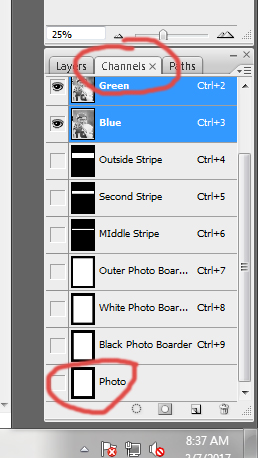
Hold down the CTRL key and click on the photo channel. You should see the photo selection appear on your project.
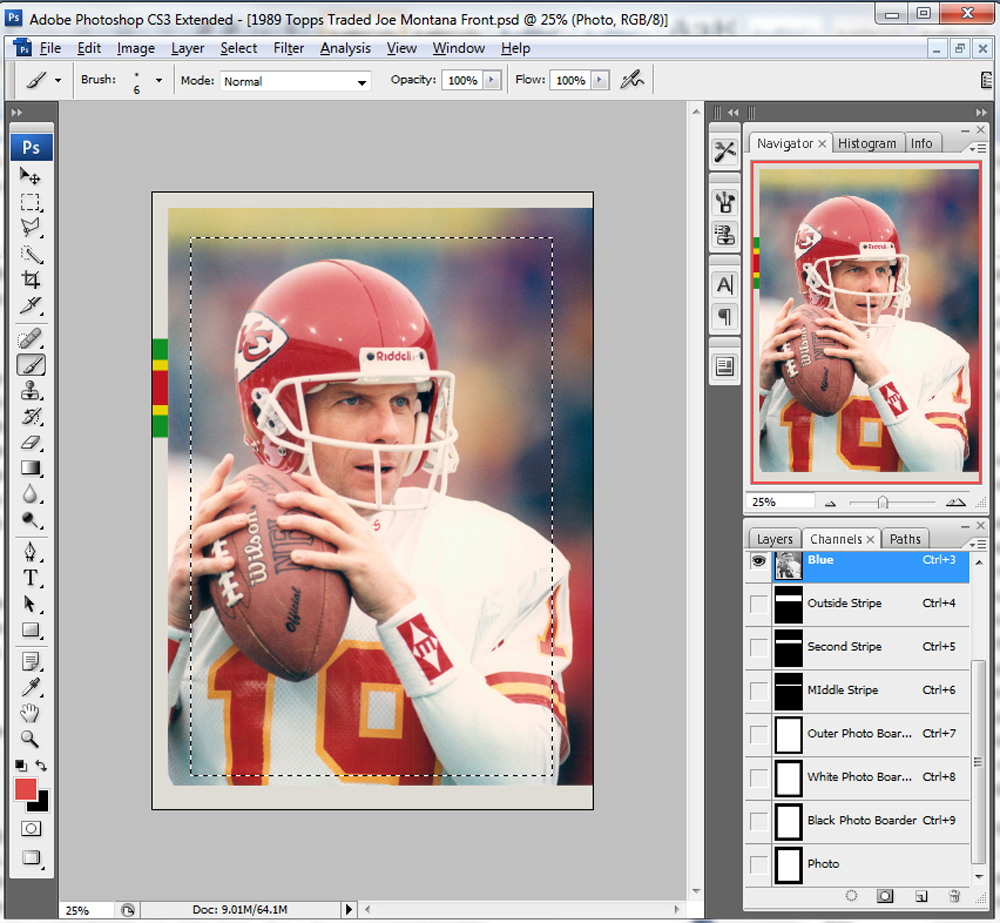
Now, click back on to the “Layers” tab and click the layer mask button at the bottom. This will put a layer mask on the photo layer which will hide any part of that layer outside of the selection.
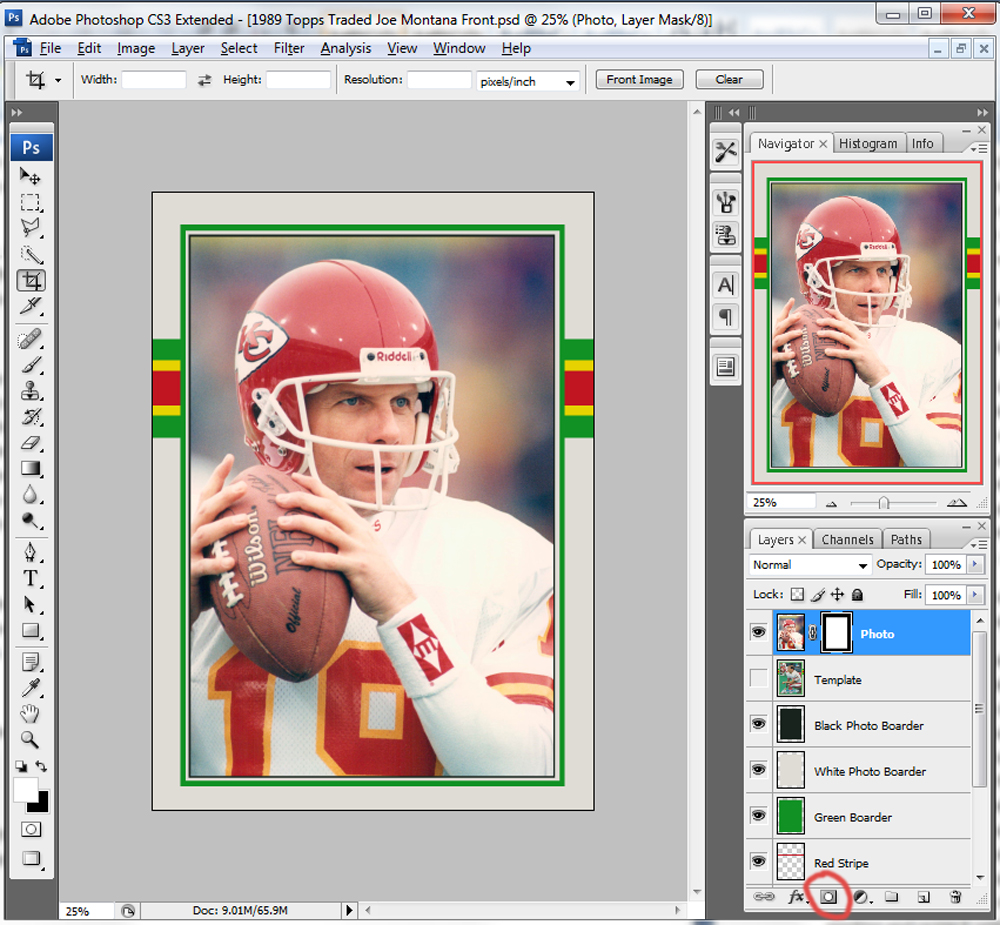
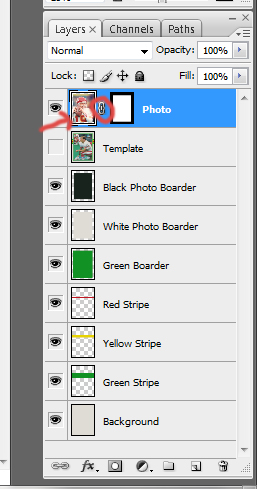
Now the photo should be nicely within its frame on the card. However, you will probably want to do a little fine tuning on its size and position. In the layers menu on the right, you will see three things inside the photo layer. You will see the photo, a lock and the mask. Normally, the mask is highlighted by default. Click on the photo symbol to highlight it instead. Also, click on the lock to make it disappear. This unlocks the photo from the mask and allows the photo to be moved around and altered without affecting the size and the position of the layer mask.
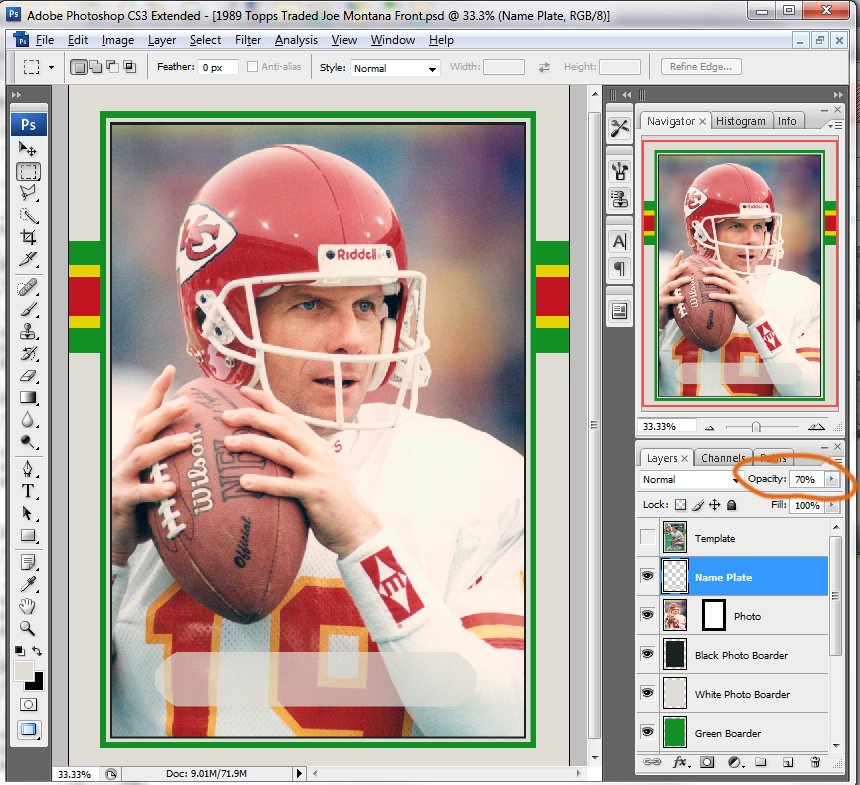
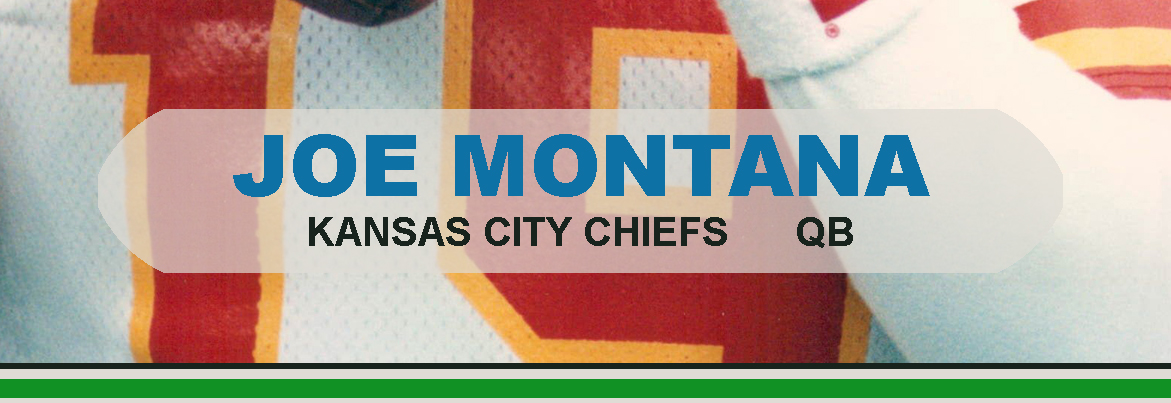
Once you have done that, you can use the Free Transform Mode again to fine tune the size and the position of the image inside the mask. Once you are done, you are ready to move onto the final process of creating the name plate on the card.
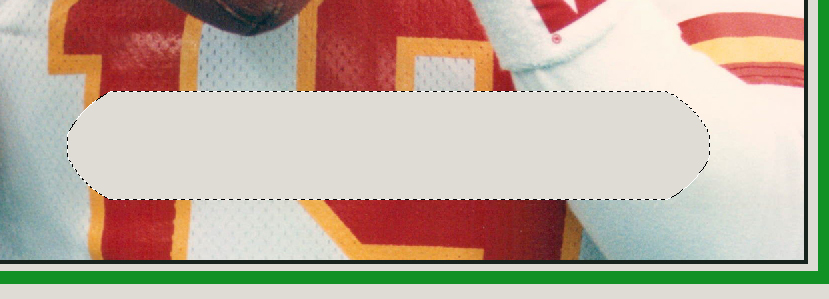
Next, use the eye dropper tool to select the white card stock background of the card. Take the Rectangular Marquee Tool and select around the shape of the whitish boarder around the name. Focus on getting the selection rectangle around all the high points. We will modify the selection to fit our needs.
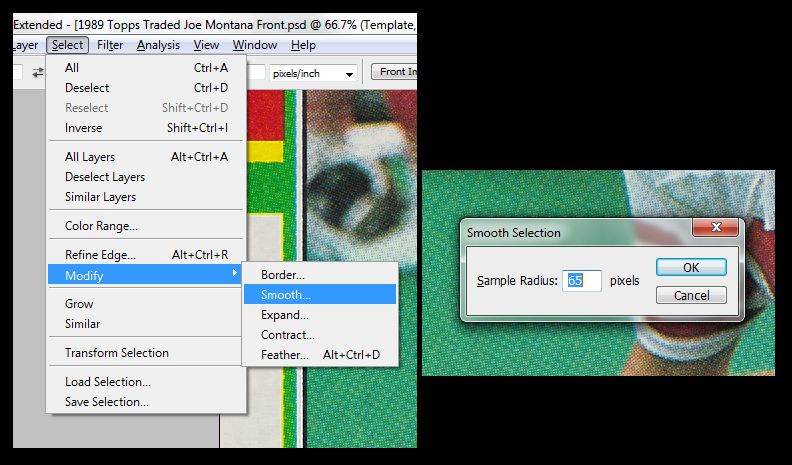
Next we need to make the selection rounded to match the shape on the card. To do this, you want to “Smooth” the selection. To do this, go to the toolbar and Click Select/Modify/Smooth. This will bring up a menu asking for a sample radius. At this point, a little experimenting is needed to get it just right. Ultimately I selected a sample radius of 65. But, that took a couple tries. Edit/Undo on the toolbar is your friend here. If you don’t like the result, Undo it and try a different radius:
As a quick aside here…many cards you might want to recreate have rounded boarders for their designs instead of square. Smoothing a selection is a great way to create those shapes.
My design will be based on one of the Topps Traded sets…as Topps Traded was just for this kind of theme. I’m a big fan of the 1989 Topps set (long story) so I will be doing the card in that design. 1989 Topps is also a good choice for a tutorial as it’s a fairly straightforward design…so it’s a good place to start.
I like to start creating a custom card by starting with the front side first. There are many ways to do this and I am far from an expert when it comes to Photoshop. This will be a crash course in how I do it but if you are new to Photoshop I encourage you to look at some online basic Photoshop tutorials and youtube videos. You will get a much better Photoshop education that I can provide. This tutorial does not show every feature of Photoshop and I find that I learn a new tool or trick with each card I create. So, playing with the program and reading general tutorials in using the program will be a big help.
One video I do highly recommended is the following Youtube video. I did not create this video nor do I have anything to do with it. But, when I first stated creating customs it gave me some basic information that was very helpful.
The first thing you will need is a nice template card to use a as model for your project. 1989 Topps have a variety of different colors for the stripes and boarders on the front and they do not correspond to the team colors. So, I did some research and picked a color set of colors that I liked. I have chosen to use the 1989 Topps Mike Cofer card as my model.
Once you have selected your model card, scan it and crop it. Resize it to be 1500x2100. Make sure the card scales properly when resized. It probably won’t be exactly 1500x2100…but you want the biggest side to match that size. For example, my scanned Cofer is actually 1495x2100. That will work.
Once you have your model card…you are ready to start. Open Photoshop and select File/New. You want to create a new project with the Width at 1500 pixels and the Height 2100 pixels. Make the background transparent. Click OK. This gives you your basic card size and outline. In the lower right hand corner you should see your layer…it should say “Layer 1.” Double click on that and rename it “Background” and press enter. Keeping your layers organized is going to be very important as you will be frequently moving from layer to layer.
Next, drag your model card into Photoshop and center it as best as you can (it will probably be slightly smaller than your 1500x2100 project). Also, if your scanned card is off center, now is the time to center it in your project. Once you have it centered, rename this layer “Template.”
Now is time to actually start building your card. I like to build cards from the outside in…layering each component together to make the final image. First thing you want to do is look at the design. With 1989 Topps, the card has a white stock and you have a 3 color stripe that runs horizontally across the card roughly two thirds of the way to the top. That is broken by a colored boarder that matches the outside color of the stripe (in this case green). Inside the green boarder there is a white stock boarder and then a very thing black box around the photo. You want to replicate each part of the design.
First you want to color your background. Take the eye dropper tool and click the white card stock of the card. This will select that color. Next, click on the “Background” layer in the lower right (so that layer is selected) and press Alt+Delete. This will fill the transparent background with that whitish color. If you click the “eye” next to the “Template” layer (so it hides the layer), you will see your background is now the same white as the card.
Next, we will create the green horizontal stripe. First, click the new layer tab in the bottom right. A new layer should be created, make sure it’s the top layer on the list (if not click and drag it to the top). Name it “Green Stripe.” Next, take the eye dropper tool and click the green color of the stripe.
Now, let’s create the green stripe. Make sure the “Green Stripe” layer is highlighted. Click the Rectangular Marquee Tool and create a selection with it that traces the green stripe. Press Alt+Delete and that selection should fill with the green color.
I like to design my cards in such a way that the design is repeatable. Perhaps I’d like to create another 1989 Topps card in the future…so I like to save my selections. That way, you can call it back up in the future. At the top click “Select” and at the bottom is “Save Selection.” Click “Save Selection” and name it “Outside Stripe” and press OK. I do this for all my selections.
Drag the “Template” layer to the top of the layers list…and repeat these steps for each of the other two stripes. Once you have all three stripes made, it should look like the image below. Click the “eye” next to the template layer to hide it. Here is your card so far:
Now that the stripe is done, it’s time to start making the photo boarder. We are going to do this using the same technique. Use the eye dropper and select the green off the card you are creating (not the template – whenever possible pull colors off your card as the template will not have perfectly uniform colors). Create a new layer (name it “Green Boarder”). Using the Rectangular Marquee Tool, outline the green photo boarder and fill it using Alt+Delete.
Next, select the whitish cardstock color with the eye dropper. In a new layer (“White Photo Boarder”) trace the white boarder around the photo (just inside the green boarder) with the Rectangular Marquee Tool and fill. It should look like this:
A common theme with a lot of Topps cards is a thin black boarder around the photo. If you zoom in on your template you will see this it. Look here:
To make the cards look as authentic as possible, I like to replicate this. Now, Topps didn’t use a true black for these types of boarders. It’s more of a dark grey. So, I like to use the eye dropper tool to select that color and again, use the Rectangular Marquee Tool to outline the boarder and fill it (in a new layer titled “Black Photo Boarder”).
Your card should now look like this:
Now come the part where we turn our collection of colored boxes into an actual football card. Do a google search and find a photo of the player. Try to find one that is a higher resolution if possible. The lower the resolution, the more you will have to stretch it and the grainier it will look. Once you have your photo, set it aside.
Next, take your Rectangular Marquee Tool and draw a rectangle around the boarder of the photo…in the exact same way you have done several times up to this point. But, this time…rather than fill that selection, you want to save it. Name the saved selection “Photo.” If you haven’t been saving your selections up to this point, look above for instructions how (right after the green stripe was made I discussed this).
Now, drag your photo into Photoshop. This will bring the photo into the Photoshop program but as a different project. In the layers tab, you will see it say “Background.” Simply drag that onto your card project and the photo will appear as a new layer.
Rename the new layer “Photo.” At this point, you want to get the photo to be roughly in the right place. If the photo is too big or too small…press Control+T to put it in free transform mode. You will now see the boarders of the photo highlighted. Hold down shift (this will keep the scale accurate) and grab one of the corners to resize the photo. Get the photo to roughly the right size and then click the check mark at the top of the screen to lock it in place. While in Free Transform mode you can also drag the photo around to get it in the right position. It’s OK if some of the photo is off the project as long as the part of the photo you want to use is roughly correct.
Now it’s time to create a layer mask to frame your photo. Make sure the “Photo” layer is selected. Just above the layers you will see a few tabs, one of them is “Channels.” Click on that and you will find all your saved selections. At the bottom should be “Photo.”
Hold down the CTRL key and click on the photo channel. You should see the photo selection appear on your project.
Now, click back on to the “Layers” tab and click the layer mask button at the bottom. This will put a layer mask on the photo layer which will hide any part of that layer outside of the selection.
Now the photo should be nicely within its frame on the card. However, you will probably want to do a little fine tuning on its size and position. In the layers menu on the right, you will see three things inside the photo layer. You will see the photo, a lock and the mask. Normally, the mask is highlighted by default. Click on the photo symbol to highlight it instead. Also, click on the lock to make it disappear. This unlocks the photo from the mask and allows the photo to be moved around and altered without affecting the size and the position of the layer mask.
Once you have done that, you can use the Free Transform Mode again to fine tune the size and the position of the image inside the mask. Once you are done, you are ready to move onto the final process of creating the name plate on the card.
Next, use the eye dropper tool to select the white card stock background of the card. Take the Rectangular Marquee Tool and select around the shape of the whitish boarder around the name. Focus on getting the selection rectangle around all the high points. We will modify the selection to fit our needs.
Next we need to make the selection rounded to match the shape on the card. To do this, you want to “Smooth” the selection. To do this, go to the toolbar and Click Select/Modify/Smooth. This will bring up a menu asking for a sample radius. At this point, a little experimenting is needed to get it just right. Ultimately I selected a sample radius of 65. But, that took a couple tries. Edit/Undo on the toolbar is your friend here. If you don’t like the result, Undo it and try a different radius:
As a quick aside here…many cards you might want to recreate have rounded boarders for their designs instead of square. Smoothing a selection is a great way to create those shapes.